Rolling a joint by hand is one of those skills that separates casual smokers from people who actually know what they’re doing. It looks simple when someone experienced does it, but your first few attempts probably ended in a loose, canoe-shaped mess. That’s normal. This guide breaks down the entire process into manageable steps, covers the materials you actually need, and explains the techniques that make the difference between a joint that burns evenly and one that falls apart in your hand.
📺 Video Guide
What You Need Before You Start
Before you even touch a rolling paper, get your supplies lined up. Trying to roll with missing materials is a recipe for frustration. Here’s what belongs on your rolling tray:
Cannabis flower: About 0.5 to 1 gram per joint, depending on the paper size. Quality matters here. Dry, properly cured cannabis grinds better and burns more evenly than flower that’s too moist or too brittle.
Rolling papers: Standard 1 1/4 size papers work for most people. King-size papers hold more but are harder to roll if you’re new to this. Thinner papers (rice or hemp-based) burn slower and let you taste the flower, not the paper. Brands like RAW, Elements, and OCB are popular for a reason, according to the Leafly rolling guide.
Grinder: A quality grinder produces a consistent texture. Hand-breaking works in a pinch, but it leaves uneven chunks that create hot spots and uneven burning.
Filter tips (crutch): A small piece of stiff paper or cardboard rolled into a cylinder. You can buy pre-cut tips or make your own from a business card. The filter keeps herb out of your mouth, provides structural support, and means you can smoke the joint down to the end without burning your fingers.
Rolling tray: Any flat, clean surface works. A dedicated tray catches fallen herb and keeps everything organized.
💡 Pro Tip
If you’re a total beginner, start with slightly thicker papers (like RAW Classic). They’re more forgiving than ultra-thin rice papers, and you won’t tear them while learning. Move to thinner papers once your technique improves.
Step 1: Grind Your Cannabis to the Right Consistency
The grind is where most people mess up without realizing it. You want a medium-fine consistency, similar to coarse sea salt. Too fine and the joint becomes difficult to draw air through. Too coarse and it burns unevenly, with one side canoe-burning while the other barely catches fire.
Place your bud in a two-piece or four-piece herb grinder and twist about 10 times. Open the grinder and check the consistency. If there are still large chunks, give it a few more twists. A four-piece grinder with a kief catcher is ideal because it collects the trichomes that fall off during grinding. Those trichomes can later be sprinkled on top of a joint for extra potency.
Research from the National Institutes of Health confirms that how cannabis is prepared before consumption affects the release of cannabinoids during combustion. A consistent grind creates more surface area for heat exposure, which means more efficient extraction of THC and CBD.
Step 2: Make Your Filter Tip
Take a piece of stiff paper, roughly 2 cm wide and 6 cm long. Thin cardboard like the flap from a rolling paper pack works perfectly. Make three small accordion folds at one end (creating an M or W shape), then roll the remaining paper around those folds to form a cylinder.
The accordion folds prevent herb from pulling through while still allowing good airflow. The finished tip should be firm but not so tight that you can’t draw air through it easily. Test it by blowing gently through it before placing it in the paper.
The diameter of your filter determines the diameter of your joint. A thicker filter makes a fatter joint that’s easier to roll but burns through herb faster. A thinner filter creates a more slender joint with better herb efficiency. For standard 1 1/4 papers, aim for a filter about the diameter of a pencil.
Step 3: Fill and Shape the Paper
Hold the rolling paper with the adhesive strip facing you and running along the top edge. The glue side should be on the far side from you, sticky side up. Place your filter tip at one end of the paper.
Sprinkle your ground cannabis evenly along the length of the paper. Most people use between 0.5g and 1g, but use what fits your paper size. Distribute the herb in a slight cone shape if you want a cone joint (more herb at the tip, tapering toward the filter) or evenly for a straight joint.
Now comes the critical step that determines whether your joint turns out well. Use your thumbs and index fingers to gently roll the paper back and forth, shaping the cannabis into a cylinder. You’re not trying to close the joint yet. You’re just compressing and forming the herb into an even, cylindrical shape inside the paper. This shaping step usually takes 5 to 10 seconds of back-and-forth motion.
According to experienced rollers featured on High Times, this shaping motion is where patience pays off. Rushing it leads to loose spots that burn unevenly.
Step 4: Tuck and Roll
This is the moment of truth. Once the herb is shaped into a cylinder, tuck the non-adhesive side of the paper around the cannabis and the filter. Start the tuck at the filter end since the filter gives you a solid anchor point.
Use your thumbs to roll the paper up and over the herb, keeping consistent tension. The paper should wrap tightly but not so tight that you crush the herb. Think of it as wrapping, not squeezing. Once the non-adhesive edge is tucked behind the cannabis, continue rolling upward toward the adhesive strip.
Lick the adhesive strip lightly and press it down to seal the joint. Start sealing from the filter end and work your way toward the tip. If you’ve done this correctly, the paper should be smooth without major wrinkles, and the joint should feel firm but slightly springy when you squeeze it gently.
✓ Signs of a Good Roll
- ✓ Even thickness from filter to tip
- ✓ Firm but not rock-hard when squeezed
- ✓ Paper is smooth without major creases
- ✓ Filter is snug and centered
- ✓ You can draw air through easily
Step 5: Pack and Twist the Tip
Your joint is sealed, but it probably needs a little finishing. Use a pen, chopstick, or the end of a lighter to gently pack the herb down from the open tip. This removes air pockets that would cause the joint to burn unevenly or go out mid-session.
If the joint feels loose anywhere, tap it filter-side-down on a hard surface. Gravity will settle the herb downward and tighten the pack. Add a small pinch of ground herb at the top if there’s extra room after packing.
Finally, twist the excess paper at the tip to close it off. This twist acts like a wick when you light it. A short, tight twist works best. A long, loose twist just wastes paper and takes longer to light.
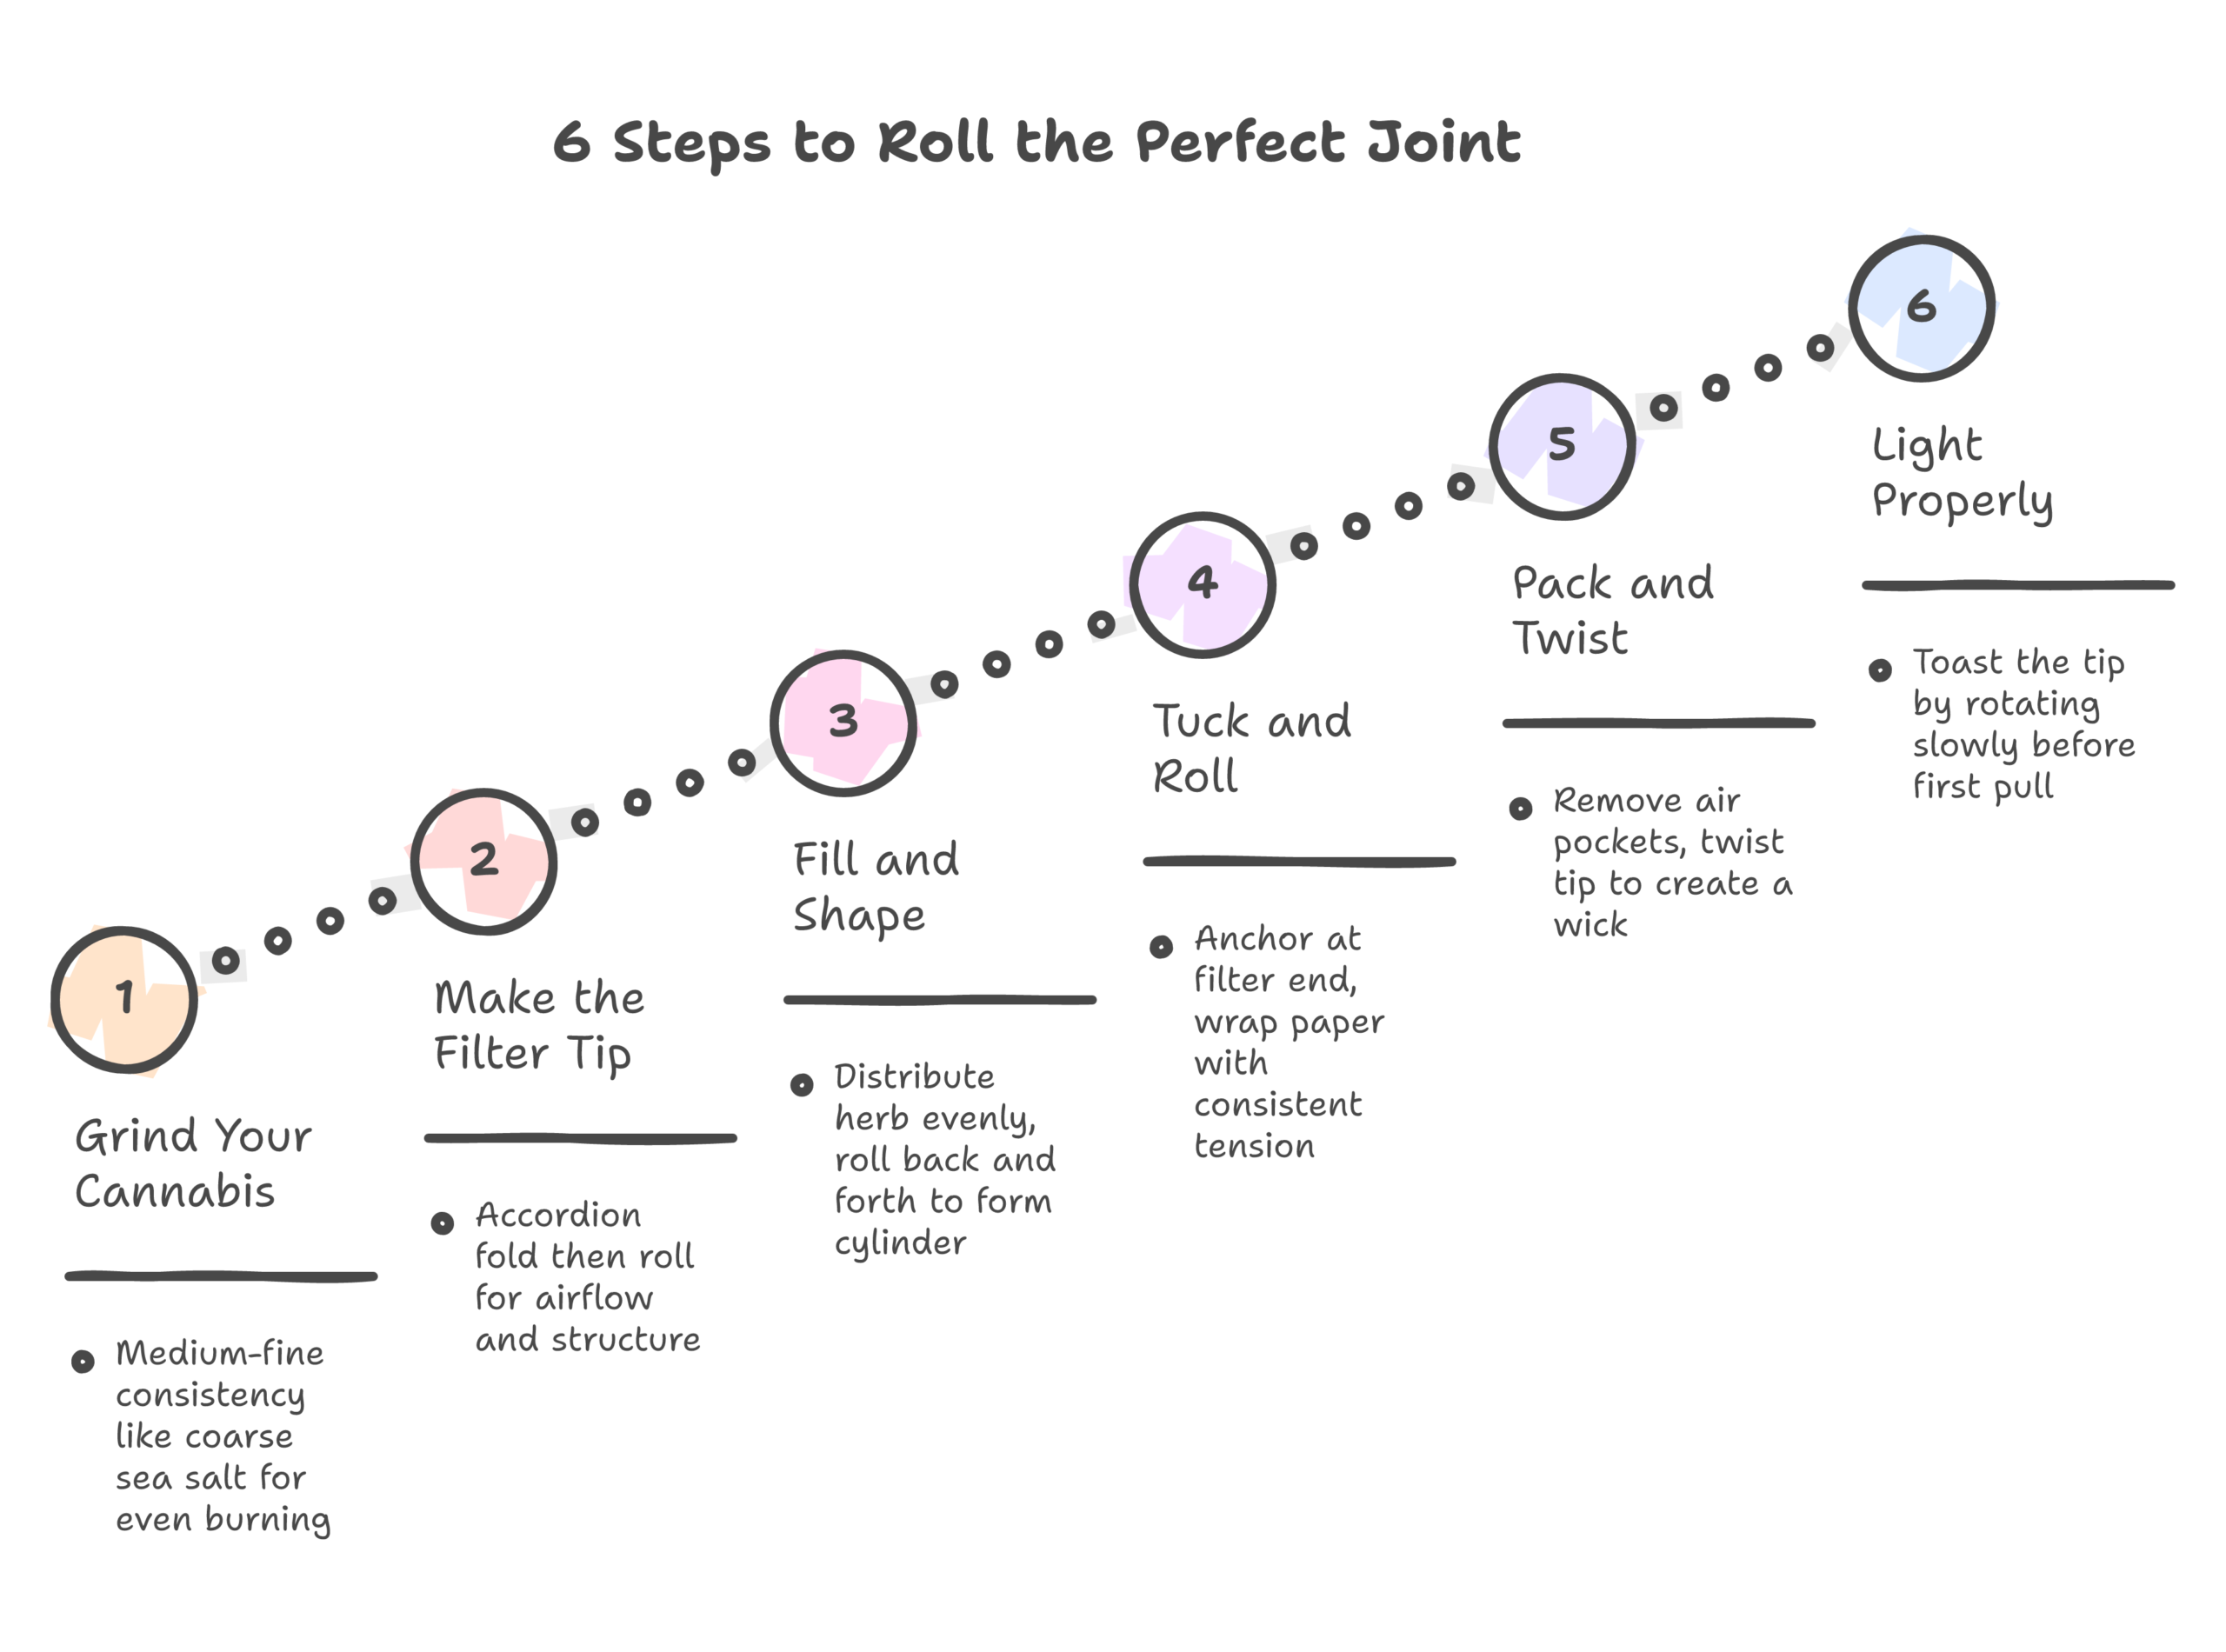
Step 6: Light It the Right Way
How you light a joint matters more than most people think. Hold the flame to the twisted tip and rotate the joint slowly, letting the tip catch evenly all the way around before you take your first pull. This is called “toasting” the tip, and it prevents one side from burning faster than the other.
Avoid holding the lighter flame directly against the joint for too long. Healthline notes that the ideal approach is to let the heat radiate rather than applying direct contact, which can cause the paper to burn unevenly. Use hemp wick if you want to avoid inhaling butane from a lighter, though the health difference is minimal for occasional use.
Once lit, take a slow, even draw. If the joint canoes (burns down one side), you can lick your finger and dab the fast-burning side with a tiny bit of moisture to slow it down. But if you followed the steps above, you shouldn’t need this fix often.
Common Rolling Mistakes and How to Fix Them
The joint is too loose. You didn’t shape the herb enough before tucking. Spend more time on the back-and-forth rolling motion in Step 3. The herb should feel like a compact cylinder before you begin the tuck.
The joint is too tight. You packed it too aggressively or rolled the paper too tightly. A good joint has slight give when you squeeze it. If you can’t draw air through it, poke a thin needle or paperclip through the center to create an air channel.
The paper tears during rolling. Your hands are either too dry or you’re applying too much pressure. Slightly moistening your fingertips helps. Also, check your herb for stems or sharp bits that might puncture the paper.
It canoes when lit. Uneven herb distribution is the usual culprit. Make sure the grind is uniform and the herb is spread evenly across the paper. Also, toast the tip properly when lighting rather than just applying flame to one side.
The filter keeps falling out. Roll the filter slightly wider than the paper allows, so it has to compress a bit to fit. That compression creates friction that keeps it in place. You can also seal the filter end with a quick lick of the paper.
📝 Important Note
Practice really does make the difference here. Most experienced rollers went through dozens of bad joints before finding their technique. If you’re wasting too much herb during practice, try rolling with dried kitchen herbs like oregano first. The texture is similar enough to build muscle memory without the cost.
Cone Joints vs Straight Joints: Which to Choose
Cone joints are wider at the tip and taper toward the filter. They hold more herb and produce bigger hits at the start, which some people prefer for social smoking sessions. Straight joints burn more consistently throughout and are easier to roll since the shape is simpler. The Royal Queen Seeds blog recommends beginners start with straight joints and move to cones once they’re comfortable with the basic technique.
For a cone shape, distribute more herb toward the open end and less near the filter. During the tuck, keep the filter end tight while allowing the paper to flare outward at the tip. It takes practice to get an even cone that doesn’t have hollow spots near the wider end.
If cone rolling feels too hard right now, pre-rolled cones are an easy alternative. They come pre-shaped and you just fill them with ground herb using a small funnel or your fingers. It’s not quite hand-rolling, but the end result is practically the same.
Rolling Paper Types and What They Mean for Your Experience
Not all rolling papers are the same, and the differences go beyond branding. The material, thickness, and size all affect your smoking experience. The FDA’s tobacco products division categorizes rolling papers as a tobacco accessory, and while they don’t regulate cannabis-specific products federally, the material composition matters for health-conscious consumers.
Hemp papers are made from hemp fibers, burn at a medium rate, and add minimal flavor. They’re slightly thicker than rice papers, making them more forgiving for beginners.
Rice papers are the thinnest option. They burn very slowly and cleanly, producing almost no ash. The downside is they’re delicate and can be tricky to handle, especially with moist fingers.
Wood pulp papers are the classic option. They’re the easiest to roll with because they grip well, but they burn faster and can add a papery taste to your smoke.
As for size, standard 1 1/4 papers fit about 0.5g comfortably. King-size papers hold up to 1.5g but require more skill to roll evenly. For different cannabis consumption methods, papers are just one option among many.
Advanced Techniques Once You Have the Basics Down
After you can consistently roll a smooth, even joint, there are a few techniques worth experimenting with:
The backroll (inside-out roll): Flip the paper so the adhesive strip faces downward and toward you, then roll as normal. Once sealed, tear or burn away the excess paper. This reduces the total paper burned, resulting in a cleaner-tasting smoke. Dutch smokers have used this technique for decades, according to cannabis culture historians at Weedmaps.
The cross joint: Two joints intersected in a plus shape. Impressive at parties but impractical for everyday smoking. You’ll need a needle to poke a hole through the main joint and careful sealing where the two joints meet.
The twax joint: A joint with concentrate (wax, oil, or cannabis extract) applied to the outside or inside. This significantly increases potency. Apply a thin line of concentrate along the inside of the paper before adding ground herb, or wrap a snake of concentrate around the outside of the finished joint.
The hash hole: Place a thin cylinder of hash or rosin in the center of your ground herb before rolling. As the joint burns, the concentrate melts into the surrounding herb, creating an intensely flavorful and potent smoke. This technique works best with high-quality full-spectrum concentrates.
Storing Your Rolled Joints
If you’re rolling joints in advance (for a trip, event, or just convenience), storage matters. A rolled joint left loose in a pocket will get crushed and dry out. Use a joint tube, doob tube, or even a clean pen cap to protect it.
For longer storage (more than a day), keep pre-rolled joints in an airtight container at room temperature. Humidity packs like Boveda 62% can help maintain the ideal moisture level inside the container. According to our cannabis storage guide, the same principles that keep flower fresh apply to pre-rolled joints: avoid heat, light, and excess humidity.
Pre-rolled joints can stay fresh for about a week in a sealed container. After that, the herb starts to dry out, the paper becomes brittle, and the smoke quality drops noticeably. Roll only what you’ll use within a few days for the best experience.
💡 Pro Tip
Label your pre-rolled joints if you’re storing multiple strains. A piece of tape with the strain name on the tube saves you from guessing later. If you’re particular about effects, this small habit prevents accidentally smoking an energizing sativa when you wanted a relaxing indica before bed.
Frequently Asked Questions
How much cannabis do I need for one joint?
A standard joint uses 0.5 to 1 gram of ground cannabis. For a 1 1/4 size paper, 0.5g to 0.75g is comfortable. King-size papers can hold up to 1.5g. Start with less while you’re learning, as it’s easier to roll a thinner joint than a fat one.
Why does my joint keep canoe-burning on one side?
Canoeing happens when the herb isn’t evenly distributed, the grind is inconsistent, or you didn’t toast the tip evenly when lighting. Make sure your ground cannabis has a uniform texture and is spread evenly across the paper. When lighting, rotate the joint while applying heat to the tip.
Is a filter tip necessary when rolling a joint?
It’s not strictly necessary, but it’s highly recommended. A filter prevents herb from getting in your mouth, provides a stable mouthpiece, improves airflow, and lets you smoke the entire joint without burning your fingertips. Research from the National Library of Medicine suggests that filtration can reduce some particulate matter in cannabis smoke.
What’s the best rolling paper for beginners?
Hemp papers in 1 1/4 size are the best starting point. They’re thick enough to handle without tearing, grip well during the roll, and burn at a moderate pace. RAW Classic and OCB Virgin are both solid beginner choices.
How long does it take to learn to roll a good joint?
Most people can roll a smokable (if imperfect) joint after 5 to 10 attempts. A consistently good roll usually takes a few weeks of regular practice. Speed comes naturally after that. Experienced rollers can produce a clean joint in under 30 seconds.
⚠️ Disclaimer
This article is for informational purposes only and does not constitute medical or legal advice. Cannabis laws vary by jurisdiction. In Greece, CBD products with less than 0.2% THC are legal, while THC-containing cannabis requires a medical prescription. Always check your local regulations before purchasing or using cannabis products. Information is current as of March 2026. For our full disclaimer, visit cannastoreams.gr/disclaimer.